Showing posts with label easy project. Show all posts

Wednesday, February 29, 2012

Gift bag #1 created by Cathy Stai

Gift bag #2 created using Art Philosophy Cartridge
 Using Kraft (Z1375), Cocoa (X5642), Hollyhock (X5919) and Colonial White Cardstock (1388) pieces  were cut using the Art Philosophy Cricut Cartridge.

Cathy Stai ~ Independent Consultant ~ Close To My Heart ~ In Love with Ink!
Shop with me ctmh.com/cstai

Monday, January 23, 2012

Make-n-Take @ Crop for a Cure

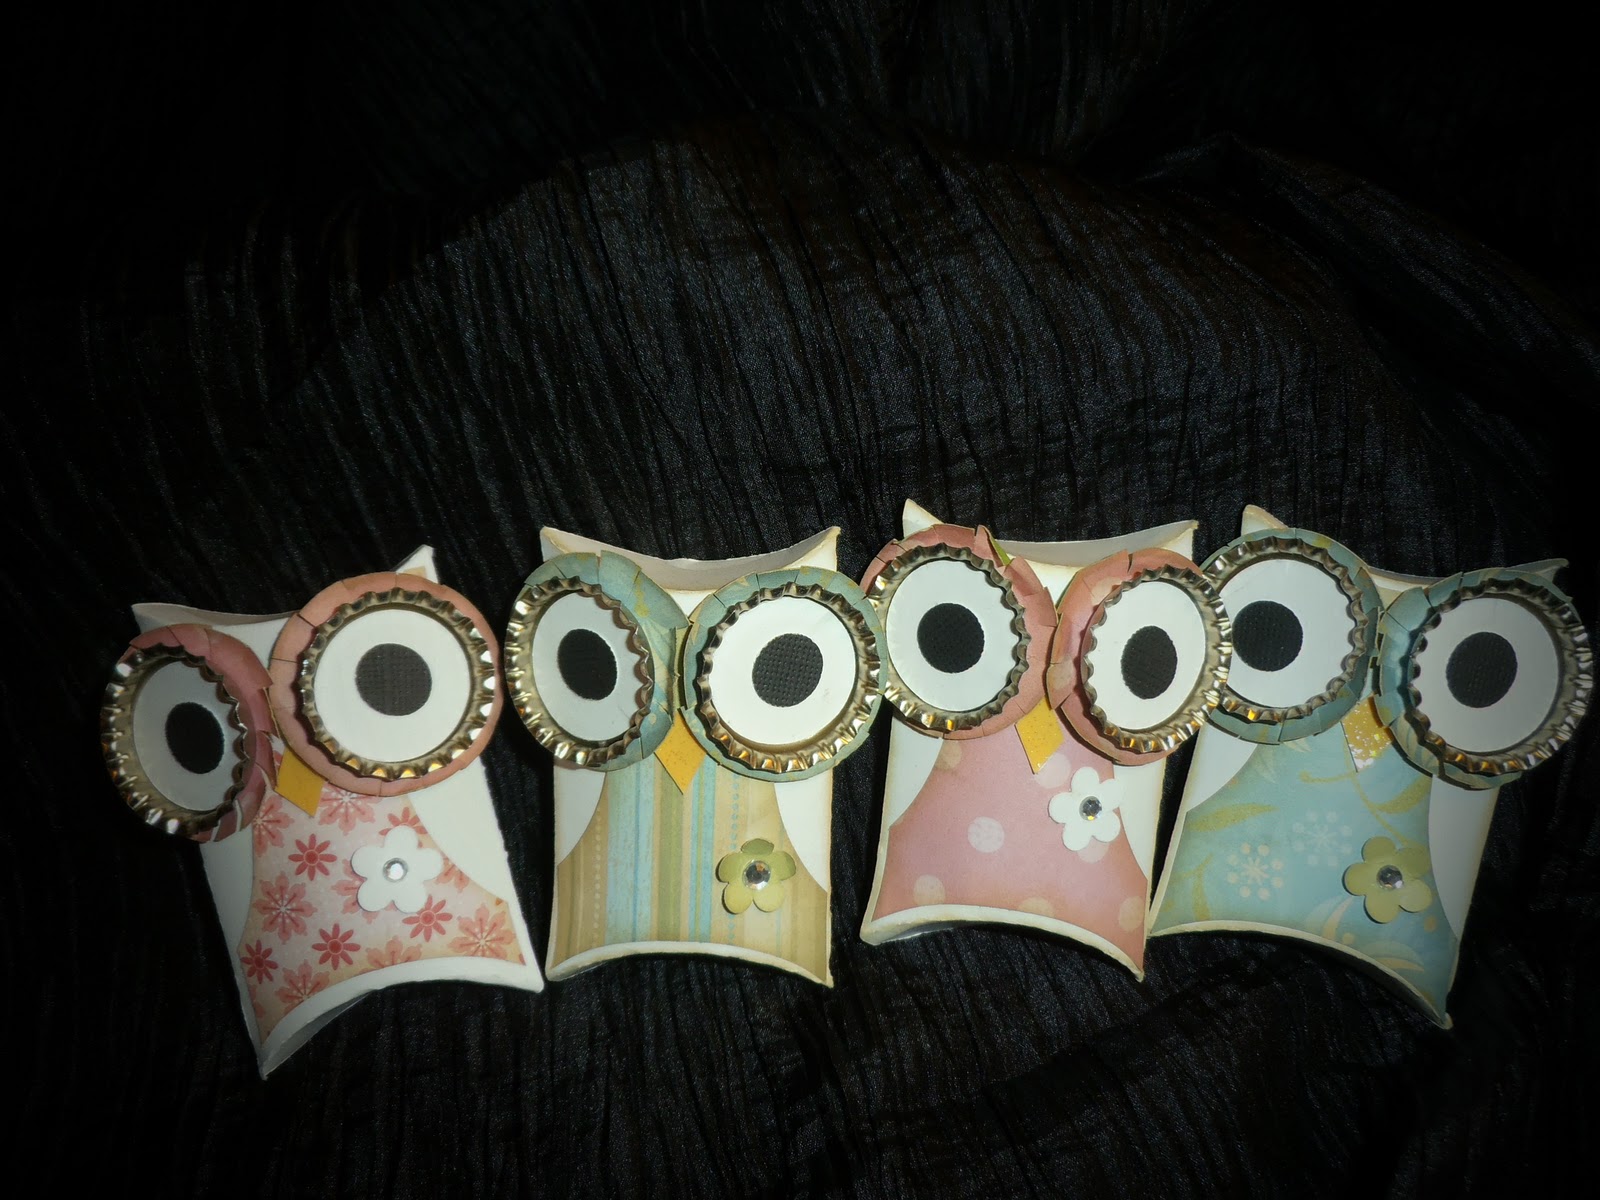
Owl always love these:  Pillow Gift Boxes


Movie Money fits perfectly

Great for small gifts.  I added labels on the back 'Owl Be Your Valentine' to make them special.  Pillow Gift Boxes cut using the CTMH Art Philosophy Cricut Cartridge with fun bottle cap eyes!

Cathy Stai ~ Independent Consultant ~ Close To My Heart ~ In Love with Ink!
Shop with me ctmh.com/cstai

Sunday, January 22, 2012

Craft Warehouse Challenge

I was the lucky door prize winner in our monthly Craft Warehouse Scrapbooker's Club.  I won this very cool BoBunny Snowflake Chipboard Book.  Our challenge was to cover chip board - here is my door prize completed.
Front Cover - the brown snowflake if from the back of the album.  Ribbon ties from Close To My Heart
Calvan playing at Grandma's
Chipboard man covered w pattern paper
Other side of Chipboard man
Outside shoveling snow with Uncle Scott
About 3 wallet pictures fit per page
Last page w Uncle Scott after shoveling - crazy boy in shorts

Cathy Stai ~ Independent Consultant ~ Close To My Heart ~ In Love with Ink!
Shop with me ctmh.com/cstai

Tuesday, January 3, 2012

January 19, 2012: Selah Parks & Rec Crop Events

Just right for showing your love.
 The Selah Parks & Rec out of the Selah Civic Center is offering crafting time on the 1st and 3rd Thursdays through May 2012 for a minimal fee.  We will be making this cute tag for January 19th's Make-n-Take.  ($2 to cover costs)

Call the Parks & Rec office for more information: 509-698-7300

Cathy Stai ~ Independent Consultant ~ Close To My Heart ~ In Love with Ink!
Shop with me ctmh.com/cstai

Wednesday, December 21, 2011

Gag Gift Card Tag

14 is Tony Stewart - Nascar
Cut paper to 4" x 6" to make this size shirt - tag
I had this idea to add this tag to my In-laws gift basket because it's their son's favorite driver, not theirs.  We will have to see their reaction at Christmas! 

Cathy Stai ~ Independent Consultant ~ Close To My Heart ~ In Love with Ink!
Shop with me ctmh.com/cstai

Monday, December 19, 2011

DIY Decorative Vase

Vase
Vase
  • Cut out 130 2" scalloped circles from Grey Flannel cardstock using the shape on the Cricut® Art Philosophy cartridge (Z1686) or by punching the circles using the 2" scallop circle punch (Z1392).

  • Staple the circles together in stacks of five.

  • Squeeze and scrunch the edges then adhere two stapled sets together on the flat sides to create a spherical shape.

  • Sponge edges with Grey Flannel ink if desired.
  • Place the finished flowers inside a glass carafe or vase.
  • Wrap Sweet Leaf ribbon from the Designer Ribbon green collection (Z1616) around the neck of the vase to accent.

Cathy Stai ~ Independent Consultant ~ Close To My Heart ~ In Love with Ink!
Shop with me ctmh.com/cstai

Sunday, December 18, 2011

DIY Desk Calendar

 December 9, 2011 ~

DIY Desk Calendar, Art Canvas, and Vase

Ah, home sweet home, where we get to decorate to our heart’s delight! Add these beautiful DIY dècor pieces to your home to live inspired every day. We’ve chosen a sleek color scheme of Grey Flannel, Black, and White Daisy, with a pop of Pear, and we used the graphic flowers from the My Acrylix® Dreamin’ Workshop set to add subtle texture to the White Daisy paper in the desk calendar and art canvas. Here are a few hints for you as you create these chic projects.
Desk Calendar
Desk Calendar
  • Create the triangular base of this calendar by folding a 12" × 12" piece of chipboard at the 3" and 7 1/2" marks.
  • Insert three pins from the Bling assortment (Z1466) and clip the sharp ends if they protrude too much. (Tip: You can use hot glue on the back to anchor the pins.)
  • Cut twelve 3 1/2" scalloped squares from Pear cardstock using the shape on the Cricut® Art Philosophy cartridge (Z1686) and sponge the edges with Pear ink.
  • Cut twelve 3 1/2" squares from Grey Flannel cardstock and sponge edges with Grey Flannel ink.
  • Use the 3" chipboard squares from the My Creations® memory game (Z1614) for the date tiles. Stamp the background flower pattern in second generation using Grey Flannel ink and then stamp the month or numbers with black StazOn® ink. Sponge the edges with Grey Flannel ink. (Tip: Stamp two of numbers 1 and 2. Stamp one each of numbers 3 – 9 and 0.)
  • Back each month and date tile with the 24 pieces of cardstock and then punch a hole in the top for easy hanging.

Cathy Stai ~ Independent Consultant ~ Close To My Heart ~ In Love with Ink!
Shop with me ctmh.com/cstai

Sunday, December 11, 2011

Santa Gift Bag - Cricut Art Philosophy Shapes

5" size bag
I have been having great fun playing with my CTMH Cricut 'Art Philosophy' cartridges (Z1686) and decided to create these Santa Bags from just the shapes from the AP cartridge.  Below are the pre-assembled shapes and supply lists.

Created by Cathy Stai
Piece
Size Inches
Key Pad #
Function Keys
Comments
Hat Rim
1 ½
6
Decorative Layer
White – distress edges + Ink w Bamboo
Beard
2 ½
46
Shift Layer
White – flower – fold in half – use pop up adhesive in between fold -Ink front edges in Bamboo –
Use the center circle from the flower and two of the inside flower cuts

Mustache
OR
2 ½
38
Shift Layer
White – Bracket – Ink edges w Bamboo
Mustache #2 choice
2 ½
12

White – Accent – use half include small oval for nose - Ink edges w Bamboo
Head
3 ½
17

White - Shape 7 – Ink bottom edges w Bamboo
Hat PomPom
1
1

White – circle - distress edges + Ink w Bamboo


Face
1 ½
12
Oval 2
Bamboo - Oval
Trace oval w shape of mustache and cut, punch small eye holes put black cardstock behind, chalk pink on cheeks and chalk red on nose

Hat
2 ½
8
Shape 11
Cranberry  – Ink edges in Chocolate
Bag
5
3
Shift Font Layer
Cranberry – Ink edges in Chocolate

Supplies
CTMH #
White Cardstock
X5921
Cranberry Cardstock
X5908
Bamboo Cardstock
X5921
Black Cardstock
X5921
Chocolate Ink
Z2111
Bamboo Ink
Z2103
Cricut Art Philosophy Cartridge
Z1686
 3-D Foam Tape
Z1151
Any Pink and Red Chalk
 n/a

Cathy Stai ~ Independent Consultant ~ Close To My Heart ~ In Love with Ink!
Shop with me ctmh.com/cstai

Monday, November 14, 2011

Frank has Treats!

Created using the 'Art Philosophy' Cricut Cartridge.  Scraplifted from fancymelissa.com/blog

Notice the 'Head Bolts' cut from silver cardstock and then secured with Bitty Brads (Z1368)
Sorry for posting this after Halloween, due to giving them as gifts, I didn't want to give away the surprise.

Using the 'ART PHILOSOPHY' Cricut cartridge (Z1686), including the 3-D box, I used a 'tree branch' for the mouth and free-hand cut the hair then inked.  

Cathy Stai ~ Independent Consultant ~ Close To My Heart ~ In Love with Ink!
Shop with me ctmh.com/cstai

Thursday, November 10, 2011

Harvest Pumpkins v2

3.5" +  5" + 11" 
Very Easy:  Wood blocks, orange paint, tree branch, fall silk branches.
Sand the edges and just add 'hot-glue'!
We made these wonderful wood block pumpkins at Westside's Craft gathering.  This grouping is actually for Elaine, she was running late, so I took them home and finished them for her birthday.

Cathy Stai ~ Independent Consultant ~ Close To My Heart ~ In Love with Ink!
Shop with me ctmh.com/cstai

Wednesday, November 9, 2011

Harvest Pumpkins

Wood Block Pumpkins
3.5" + 5" + 11"

Such a fun project!  Wood block pumpkins from Westside Craft gathering last week.  Stay tuned for my next post of another set just a little different and still so cool.


Cathy Stai ~ Independent Consultant ~ Close To My Heart ~ In Love with Ink!
Shop with me ctmh.com/cstai

Thursday, October 27, 2011

Wood Block Ornament by Ronette Williams

Design created  by Ronette Williams 

Side 2

Side 3

Side 4
Amazing what you can do with a small wood block painted white when you are Ronette and her helpers!!  The top has a small metal hook screwed into the top with the ribbons and bells tied on. 

Cathy Stai ~ Independent Consultant ~ Close To My Heart ~ In Love with Ink!
Shop with me ctmh.com/cstai

Thursday, October 20, 2011

Buttoned Up Card Set Video


Buttoned Up Card Set

Lovely, chunky, fashion-forward bling turns your cards from charming to super-fantabulous. Learn the WOW techniques in this how-to video from Close To My Heart, and then send holiday cards that people will be talking about into the New Year

Cathy Stai ~ Independent Consultant ~ Close To My Heart ~ In Love with Ink!
Shop with me ctmh.com/cstai

Wednesday, October 19, 2011

Great Idea Ribbon Tie on Pillow Box Gift

 Ever wonder what is the best way to finish the ribbon on a pillow box gift??  Well a really creative lady - Caryl Durr used small magnets.  One magnet is secured to the end of the ribbon tie and the other to the pillow box on the back.

Pillow Box created by Caryl Durr
So smart - use magnets.
Thanks Debi for letting me share your gift and thanks Caryl for being so creative and generous!!

Cathy Stai ~ Independent Consultant ~ Close To My Heart ~ In Love with Ink!
Shop with me ctmh.com/cstai

Monday, September 19, 2011

Layouts from CTMH Kits


 Have you ever ran out of creativity - just when you have time to scrap?  It happens to me and I just love having one of the Close To My Heart kits called Workshops On The Go's handy to get me going again.  This layout is from one of the past Specials from CTMH called 'You & Me'.  


I hope to complete the Workshops On The Go Elemental Kit (G1026) at my next crop.  The kits have an instructional brochure, matching Level 2 Paper Pack, their own special matching My Acrylix Stamp Set and also coordinating embellishments all included.  Visit my website ctmh.com/cstai to see additional projects for all the current Workshops On The Go Kits.


Enjoy


Cathy Stai ~ Independent Consultant ~ Close To My Heart ~ In Love with Ink! Shop with me ctmh.com/cstai

Friday, September 16, 2011

Brown Lunch Bag Crafters


 Denise, Mary and Mary Leta all loved this easy project so much they immediately came up with more ideas of using the bags.  These photos were taken while they made a few extras.  Joanna said that she was going to use the white lunch sacks and then emboss with the 'spider web' embossing folder for her daughter's Halloween party.

 Cathy Stai ~ Independent Consultant ~ Close To My Heart ~ In Love with Ink! Shop with me ctmh.com/cstai

Thursday, September 15, 2011

Brown Lunch Bag Fun


 This great project was designed by Suzanne Sergi.  How smart - use your embossing folders and turn any brown lunch sack into an artsy gift bag.

It is a really easy task.  I selected embossing folders that did not have a directional pattern as you run the bag from it's top with the embossing folder on the side of the bag through your Cuttlebug. 

We used the corrugated star from Milepost Shapes (Z1464) and the tag was cut from the Art Philosophy Cricut Cartridge with the matching stamp set (Z1686).

Cathy Stai ~ Independent Consultant ~ Close To My Heart ~ In Love with Ink! Shop with me ctmh.com/cstai

Thursday, September 1, 2011

Great Video - Make Those Awesome 3D Flowers


 This video demonstrates how to make the 3-D Flowers for your layouts and craft projects.  Lisa is so creative and she has included some tricks to make your project easier.  The Art Philosophy Cricut Cartridge is available to purchase - just select the 'SHOP with ME' link.


Cathy Stai ~ Independent Consultant ~ Close To My Heart ~ In Love with Ink!

Sunday, July 31, 2011

July's Make-n-Take Project

 Check out the samples of my July Make-n-Take = Banners!

Very easy and so cute with cupcake wrapper flowers.  We used the B&T papers from My Reflections Sophia Level 2 Paper Pack, Pink Designer Ribbon, Shimmer Designer Brads, Pearls and Colonial White Cardstock.  


Visit my website:

Cathy Stai ~ Independent Consultant ~ Close To My Heart ~ In Love with Ink!
Related Posts Plugin for WordPress, Blogger...